Configuring views
Basics
Besides "record types" views are the second important element to build up your project in SketShDb: Views show all or some records of one type in a defined and configurable way. Currently there are only list views, which may sound boring at first, but list views have a large variety of configuration options that allow you to configure each list exactly to your needs.
Each list view has a wide variety of configuration options regarding the following topics:
- Layout - where to show which data in your list
- Sorting the list
- Search within your records
- Filter records
- Configure list sections to structure the list
- Define available actions in your view e.g. edit, create records, comment, add pictures in the list
- Allow user roles to show the list view
- Configure the list view's appearance by defining you own colors.
View list
By choosing Views in the project configuration you get to the view list.
 The view list gives an overview of aver all defined views. Tap the
 + button to add a new view. Note: A view for each type will automatically be created when creating a record type. Tapping and holding a list entry will open the view inside the data pane on the right (since 1.0.3).
HINT: You can access the view configuration directly from a view when tapping and holding on the title above the view (since 1.0.3). Appropriate permissions needed.
Deleting views
 Delete views by swiping left over the view name or by tapping the view and then
 Delete view. see here
Configuring views
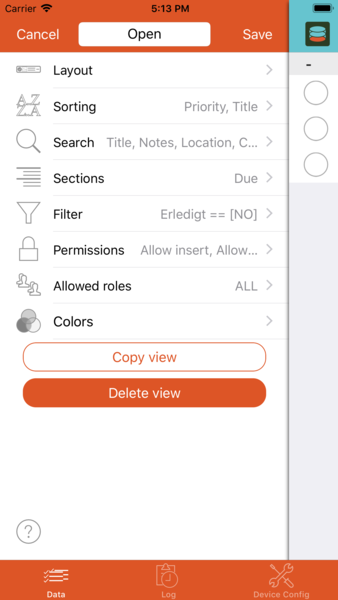
After tapping a view's entry you get the following configuration option overview:
In version 1.0.3 two buttons were added to the list: Tapping "Edit associated type" will open the type configuration for the type which is used in the currently configured view. "Open view in right pane" can be used to try out the view configuration as it will be loaded in the datapane on the right. Holding the "Save" button a little saves without leaving the configuration view, however, the datapane's content will be reloaded.
Layout (1)
Each row in a list view has a number of "positions" to be filled with data from your data records:

- Title: Textfield at top in the center of the field. If no subtitle is configured this textfield is presented in the middle, otherwise above the subtitle. If picture and/or selection marker are configured, these items will be places left of the title.
- Subtitle: Text below the title.
- Right: Text right besides the title (and subtitle, if configured).
- Accessory: Text field on the right edge, colored background.
- Selection: Can be attached to a "Switch" field: Shows a checkmark (yes/selected) or an empty circle (no/not selected). Changes the value instantly if tapped. Allows to set the values of an entire section or list if long-pressed.
- Picture: Shows the first picture of the record or a placeholder, if no pic is present
If you want to display records in different colors, it is possible to attache color properties to color fields in your record type: (if you want to color the complete list, then refer to Colors)
- Text color: The text color of title, subtitle and right text field. The accessory text color is automatically set to white or black depending on the tint color.
- Background color: The background color of the list row.
- Tint color: Defines the background color of the accessory text field, the color of the row separator line and the color of the selector icon.
Toolbar
The toolbar on the right hand side contains an element for each field of the chosen record type. Additionally it contains one element representing the configured default display properties and another element representing the record's pictures.

The toolbar can be unfolded to the left by tapping and holding.

Swipe up or down to select the appropriate field afterwards drag the field to the left and drop it to the list position where the data should be presented.  While dragging a grey background will signal valid drop targets for the chosen field.
If you drop the field above a valid drop target, the field will be assigned to the chosen position.
To gat a first impression of how a row in the list will look like, see the template table cell at the top of the configuration view.

Sorting (2)
By choosing Sorting you can configure in which order the list elements will be shown. Only sortable field types will be offered to choose
 You can choose one or more field to sort by. Drag the "sorting handle" on the right of the field names up ord down to rearrange the sorting priority of the fields.
Sort in reverse order inverts the sorting order.
When choosing a field, which contains multiple values (fields marked wit Multi-emit) a list entry will be emitted FOR EACH VALUE (at least once). The function "emitted()" can be used to get the specific value for which the record was emitted.
Currently the sorting direction (ascending/descending) can only be configured overall, not by field. Ordering differently per field is very difficult to achieve based on the underlying technology. It might be good to take this in account when e.g. defining key in a value list field.
If you activate the Sort manually switch, a button named Sort will appear in the list header. Tapping this button activates "sort mode" which lets you reorder the list items by dragging them up/down using the sort handles on the right.
Caution: If a section property is defined for the list view, it will have the highest sort priority automatically, no matter what is configured here.
Search (3)
The search configuration lets you adjust, which fields will be search when the user enters a search term in the search field above the list. If no field is selected to search in, no search field will be presented. Only searchable field are available to be choosen here.

Sections (4)
The sections settings let you configure the "subheadings" of the list. The items with same values in the selected field will be grouped to sections. The (common) value will be the subheading of the section.
 There are some more "finetuning" options:
Sort sections like in: Normally, section headings will be sorted ascending according to their field type. Sort in reverse order under Sorting has no effect fpr section headers. If the section property is a reference to another type, a view of that record type can be chosen here to apply the same sort order as in that view.
Allow section drag and drop: If this option is active, a button named Sort will be shown in the list header (regardless if manual sorting is active or not for the list). When "sorting" a record to another section, the section property field value will be changed to the other section's value. Example: In a todo list view: If sections are priorities, you could change the priority of a task by simply dragging it from one section to another section in the list view.
Show empty sections: In most cases, you dont want empty sections to show up. When using the "section drag and drop" option it can nevertheless be useful to show empty section because you would not be able to drop a record in a section that is not present.
Use "smart" section: Sections normally contain all records with exactly the same value in the section property field. Sometimes leads to very fine-grained sections consisting only of one or two records (e.g. when using date or especially time fields as section property). "Smart" sections try to address this issue by applying different combination algorithms to the list values and trying to find an algorithm that results in sections with about 5 to 10 records.
Show section index: Activate this option to show an index of the sections on the right for quick navigation.
Section index max. width: If your section index has too many entries or is too wide, restrict the index to less characters.
Filter (5)
By filtering you can determine, which elements occur in the list and which elements are left out.

Normally, you start with an empty filter expression. Tap New condition to add a condition for one field or New group to add a new condition group.
Condition groups
Groups allow to create complex nested filter expressions: Each group has a selection on its top border, allowing to choose one of these options:
- All: Each single condition in the group must be fulfilled. ("AND")
- At least 1: At least 1 condition in this group must be fufilled ("OR")
- None: None of the contained conditions may be fulfilled ("NOT" or "NEITHER/NOR")
Each group may contain any number of conditions.
Conditions
A condition consists of 3 elements:
- field name: The field that the condition applies to
- Operator: The operator for the condition, see operators
- Value: The second operand (e.g. the value to be compared to the field's value)
Currently the second operand is restricted to be a static value or in some cases a predefined dynamic value (like "current user") or a formula. It is not possible to choose another field as second operator. (i.e. conditions like "value of field A is bigger than value of field B" are not possible yet)
Operators
The operators available for a condition are determined by the field type of the chosen record type field:
| Operator | 2.Operand | Text | Number | Date/Time | Switch | Value list (single) | Value list (multi) | Reference (single) | Reference (multi) | Meaning |
|---|---|---|---|---|---|---|---|---|---|---|
| == | Value | X | X | X | X | X | X | Field value is equal to given value. | ||
| != | Value | X | X | X | X | X | Field value is not equal to given value. | |||
| < | Value | X | X | X | Field value is less than the given value. | |||||
| > | Value | X | X | X | Field value is greater than the given value. | |||||
| <= | Value | X | X | X | Field value is less than or equal to given value. | |||||
| >= | Value | X | X | X | Field value is greater than or equal to given value. | |||||
| IN | Value list | X | X | X | X | X | Field value is equal to one of the given values. | |||
| STARTS WITH | Value | X | Field value begins with given text. | |||||||
| ENDS WITH | Value | X | Field value ends with given text. | |||||||
| CONTAINS | Value | X | X | Field value contains the given text. | ||||||
| LIKE | Value | X | Field value matches the given value when ? matches any single character and * matches any number of characters. | |||||||
| MATCHES | Value | X | Field value matches the given regular expression. | |||||||
| ANY EQUALS | Value | X | X | At least one of the field's values is equal to the given value. | ||||||
| ANY IN | Value list | X | X | At least one of the field's values is equal to one of the given values. | ||||||
| ANY CONTAINS | Value | X | X | At least one of the field's values contains the given text. | ||||||
| ANY MATCHES | Value | X | X | At least one of the field's values matches the given regular expression. | ||||||
| ALL IN | Value list | X | X | All of the field's values are equal to one of the given values. | ||||||
| ALL CONTAIN | Value | X | X | All of the field's values contain the given text. | ||||||
| ALL MATCH | Value | X | X | All of the field's values match the given regular expression. | ||||||
| IS EMPTY | Value | X | X | X | X | X | The field value is empty (empty string or not set) | |||
| IS NOT EMPTY | Value | X | X | X | X | X | The field value is not empty |
Permissions (6)

The permissions configuration defines which actions are enabled for the given view:
| Permission | Meaning (when activated) |
|---|---|
| Insert | List view show a + button in top right corner that allows to add records to the list. |
| Edit | When opening a record's form, the field will be active for editing. |
| Delete | Record can be deleted in list view by swiping left over the record's entry. |
| Comment | New comments can be added to a record when record's form is opened via this list (only if form contains a comments field) |
| Add pictures | New pictures can be added to a record when record's form is opened via this list (only if form contains a pictures field) |
| Delete pictures | Already attached pictures can be deleted from a record when record's form is opened via this list (only if form contains a pictures field) |
| Create audio messages | New audio messages can be recorded for a record when record's form is opened via this list (only if form contains a pictures field) |
| Delete audio messages | Already attached audio messages can be deleted from a record when record's form is opened via this list (only if form contains a pictures field) |
| Open subforms | When record's form is opened via this list and contains fields referencing another record type, the referenced records input form can directly be opened. |
| Edit subforms | When record's form is opened via this list and contains fields referencing another record type, the referenced records input form will be editable, if opened directly. |
| insert subform records | When record's form is opened via this list and contains fields referencing another record type, new records of the referenced type can be created directly. |
Note: Permissions can not be granted to roles within one view. To work around this issue, you can copy the view and create different view instances for different roles with different view persmissions.
Allowed Roles (7)
 If the project contains multiple roles, you can grant access to this view to one or more roles. If no roles is selectes ALL roles can access this view. If access is restricted to some roles, all other roles will not even see the view in their project list.
Colors (8)
 Lets you design the list view in custom color. Try is out!
Note: The configured color may be overruled by record specific color assignments.
Copy view (9)
Coopies the current view and lets you define the name for the newly created view.
Delete view (10)
Deletes the currently selected view.