Project configuration
![]() You get there by tapping on the tools button in the project list besides the project name.
You get there by tapping on the tools button in the project list besides the project name.
This is what the project configuration normally looks like, if you own admin rights for a project:

Via the project configuration you obtain a range of options:
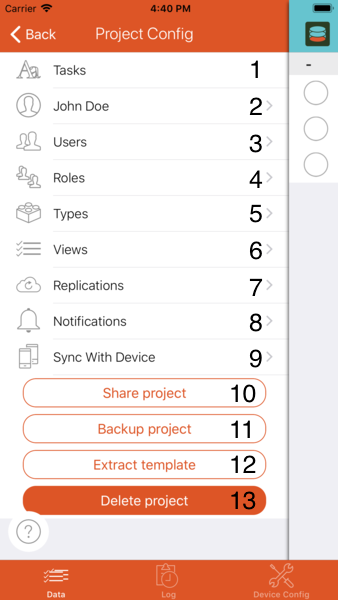
Rename project (1)
In the topmost row of the project configuration the current name of the project is shown. Tapping on the name lets you change the name of the project. The project name is local to your device, i.e. the project can be named differently on each device. It is not synced to other devices.
Change your nickname (2)
the second row shows your nickname currently used in conjunction with this project, i.e. this nickname will show up beneath the change in the log if you change a record. Tap the nickname to change it to another one of your registered nicknames. (Register nicknames under Device settings / Nicknames if you want to register further nicknames.
Changes only apply to future changes! The old nickname stays connected to all of your old changes, the old nickname stays visible in the project's user list (for all users with admin rights). Change the default nickname (in device settings) to the desired one before you create or first replicate with a project, if you want to avoid appearing under other names.
Users (3)
If you share the project with others this list shows the nicknames of all users registered in this project.
 Users new to the project need to be approved first. You can identify users that need to be approved by the "info"-icon on the right side of the list. Entries for users to be approved are created the first time the user tries to replicate/sync the project.
Approve the user by tapping the info-icon. As long as a user is not approved, the user will see the text "Ao are not yet approved for this project" in his project list and his project configuration will only contain the elements 1 (Project name), 2 (Nickname), 7 (Replication) and 12 (Delete project)
Users new to the project need to be approved first. You can identify users that need to be approved by the "info"-icon on the right side of the list. Entries for users to be approved are created the first time the user tries to replicate/sync the project.
Approve the user by tapping the info-icon. As long as a user is not approved, the user will see the text "Ao are not yet approved for this project" in his project list and his project configuration will only contain the elements 1 (Project name), 2 (Nickname), 7 (Replication) and 12 (Delete project)
 If you tap on a previously approved user, the list of available roles in this project will be shown. Choose, which roles this user belongs to within this project. If the list is empty, create roles for this project first (see below).
 As a project admin you can remove a user from a project by swiping left over the user's entry. The user's approval for this project is then removed and will (after his next project sync) see the same message as if he had never been approved. The user entry will then show up as not approved again. You cannot delete your currently active nickname and the project owner's nickname.
Roles (4)
 This option is like the above options only of interest, if you share the project with others. If you want different users to see different views you can create and maintain different roles for the project's users.
 Roles can be "normal" or "admin" roles. The owner of a project is admin by definition. Other users are admins if they are member of at least one admin role. If a user is not an admin the project configuration will only contain the options regarding the user's own device (these are 1 (Project name), 2 (Nickname), 7 (Replications), 8 (Notifications), 9 (Share), 10 (Backup), 11 (Templates) und 12 (Delete project))
 Delete roles by swiping left over the role's name.
BEWARE: As long as a project has no defained roles every user of the project automatically is an admin!
Types (5)
This option lets you configure the project's record types.
Refer to Configuring types
Views (6)
Allows to configure the project's views.
Refer to Configuring viewsn
Replications (7)
Shows the list of currently configured replications for this project. Each entry stands for a replication to a remote server, synchronizing the database to that server. The icon on the right side shows the state of the replication. Tapping on an entry lets you de-/activate or configure the replication. The configuration comprehends the following options:
- Replicate over cellular network - Deactivating this option disables this replication when not connected to a WLAN.
- Replicate when app in background - The synchronization also runs in irregular time intervals when the app is active in background only. You will then be informed about changes by local notifications, if notifications are configured accordingly. This only works when the app is RUNNING in background, not when closed in the multi tasking view of the operating system or has not been started since the device was rebooted. See more explanations here: Background fetch
- Not before - Restricts this replication to run each day only after the given time. Note: This means YOUR changes will also only be synched to the server after this time.
- Not after - As before, but restricts the replication to run only before the given time.
- Max. replication intervall - If you dont want to keep continuous network contact to the server, you can define a time interval. The replication will then run only once within the given interval. You can set the interval to "manually" to be in full control over the replications.
Notifications (8)
Project-wide settings - Notification modes
This defines the way, other users in a shared project (a project with at least 1 replication) get notified about changes.
It's particularity of SketShDb that you are in full control of your data because the data is only synchronized with the servers YOU configure (not with our or any other servers, if you don't configure it.) When using push notifications (as opposed to local notifications) it is technically impossible to deliver notifications without completely revealing the submitted data to anyone else. Local notifications in turn can only be delivered when the app is active at least in background. Then the synchronization takes place via "background fetch", that means the app gets "woken up" at irregular time intervals and performs pending synchronizations. If changes occurred, a notification will be shown. The time intervals are controlled by the operating system. There are some hybrid modes between local and full-featured push notifications. We leave the decision to you which mode you prefer for which project.
The different notification modes and their menaing are:
- 1. Local notifications only: With this mode, changes are only detected locally with "background fetch" and notifications are generated locally. No servers involved, but works only if the app is active in background and you might be notified some time after the event occurred because replications are started irregularly. The notification contains ALL details because the data gets read directly from your local database.
- 2. Background push notifications: With this mode, a push notification is sent via the push notification service. The push notification only triggers the replication. Notifications are generated locally. However, to enable delivery of the notifications the app will register itself for updates of specific databases with our service. This mode will also only deliver notifications if the app is active in background, the only difference between mode 1 and 2 is, that notifications will be triggered instantly.
- 3. Inform about changed data unspecifically: This mode uses "normal" push notifications, but the notification text will only tell you "something has happened in SketShDb". You will have to open the activity log in the app to find out what exactly changed. You also get informed about all changes in the app. No possibility to filter different event types. The advantage of this mode is that it also works if the app is not running at all and you still don't have to disclose any of your data to anyone else.
- 4. Event type with database name only: This is like the previous mode but the notification will contain the event type (new record, new comment,...) and the project name. The notification will look like "A new comment has been entered in project XY". Looks like a good compromise, if you seriously don't want anyone to know about the slightest parts of the data in the project (except the project name).
- 5. Full featured push notifications: The notification will additionally contain details about the change, like the name of the user that performed the change, the values of the default display properties and the comment's text, if applicable. This is the most comfortable mode.
Some further notes:
- Push notifications (unlike local notifications with mode 1 and 2) work completely independent from access of your device to the respective replication server! You might face situations where a notification is presented about a change that has not yet been synchronized to the app. If you wonder about changes not bein present in the app please check the replication state of the project.
- Otherwise there also might be situations where the notification reaches your device when the data record already has been changed again or deleted.
- For push notifications to work, some data (see privacy) is stored on our servers. This data is only stored as long it is necessary for the notification service to work according to your configuration for the given project.
- We would have liked to completely do without using push notifications in favor of your absolute privacy. As background updates only work when the app is active at least in background, we decided to let you choose between higher comfort or higher privacy.
Depending on the notification mode different data will be delivered to our and/or the service provider's notification service. You can find a detailed explanation on this page: Privacy
Device specific settings
These settings define, which events you will get notified about. Events you trigger by yourself you will not be informed, so these settings are only of interest if your project is shared among multiple users.
Note: Regarding mode 3 (Inform about changed data unspecifically), you will get NO notifcations for this project if you disable ALL notification types. If you enable at least one type, you will get ALL notifications. This happens because with this mode we don't even store on our side which notification types you're interested in and cannot distinguish between the types. See above for further explanation.
 The settings don't apply to the Log! There you can always see ALL changes made to the projects unless you deleted the respective log entry.
Share (9)
If you synchronize a project wit a server, you can send the server address and if you want server credentials in a simple way via email to a friend. Once your friend has tapped the link in the email, you can start to use the project together.
Before you can send the e-mail, you will be asked if you want to include credentials for the server access into the link.
NOTE: The credentials will be included encrypted into the e-mail. The link will nevertheless contain the server address, username AND password, and therefore any unauthorized person with access to our app and this e-mail would be able to access the server even if not able to read the data personally. It is by far safer to send the credentials on a different, more secure way than e-mail. NEVER include credentials into the link if your project contains confidential data or data which could be harmful to anyone when lost or diclosed!
There are different options for including or not include credentials into the share mail:
- Recipient doesn't need credentials - No credentials are included into the link. On the reciepient's side, SketShDb will first try to access the server without any credentials. Only if this fails, the reciepient will be asked for credentials.
- Let recipient enter credentials - No credentials are included into the link, but the recipient will be asked for credentials before the first attempt to connect to the server. Choose this option when your server needs authentication but you want to supply the credentials on a different way than with this e-mail.
- Include my credentials - The link will include the server credentials currently used by you. Beware! Choose this option carefully: Don't use this option if you are using admin credentials and don't want the recipient to be able to create new databases on the server or if each user has his/her own credentials on the server. If you want to pass on special credentials for the recipient choose the next option:
- Provide other credentials - You will be asked to enter credentials to be sent with the link. This, of course, does not change the credentials you are using to access the same server.
The server credentials are only used to access the replication server, not any further.
No data (neither server name, nor username or password) will be included into the e-mail text in plain, readable text (except the project name). All other data is encoded into the link. Username and password are encoded and encrypted.
Sharing database links via email only works if there is a properly configured e-mail account present on the device. However, replication with shared servers will work regardless of any email configuration.
Create a backup (10)
By using this option a backup file containing the entire project will be created on your "iCloud Drive"1. The device's main iCloud account will be used. The backed up data is NOT encrypted in any way! Therefore keep backup files in a safe place. Because the backup is stored on your iCloud Drive, you will be able to access the backup file from any device using the same account. Backups are stored in folder "SketShDb/Backups".
An iCloud account must be properly configured on the device to be able to create backup files.
Create a template (11)
This options creates a template derived from the current project, i.e. all types, views and roles together with their settings are exported. You will first be asked if you want to embed data of one or more types to the template, whih makes sense if you have base types that belong to the project structure and/or are sort of "universal".
 Choose the types to be stored with the template, then tap
 Save in the top right corner.
The template will be saved to your iCloud Drive. Therefore you can access your templates from any of your devices using the same iCloud account. The template file is not encrypted. It is stored into the folder "SketShDb/Template".
An iCloud account must be properly configured on the device to be able to create templates.
Note: Sometimes files created on a device are not visible on other devices using the same iCloud account. This is an issue of how iCloud Drive works and is not under our influence. You can, nevertheless, force iCloud Drive to update the folder contents be creating a new subfolder inside the folder and deleting it again. This is not possible from inside our app, but you can use the default iCloud app ("Files" or "iCloud Drive") for it.
Delete project (12)
By tapping this button you can delete the project including all its data and replications from the device. The project will NOT be deleted from the server! If you want to delete the project/database from your server you have to use the server administration features, because it is not posiible from within the app.
-
"Apple", "iCloud" und "iCloud Drive" are trademarks of Apple Inc. ↩